Spatial and Non Spatial Database Generation Using QGIS
Now a series of article started in which spatial database creation will be discussed. In general earth surface features are defined by spatial database in GIS. Earth surface features can be represented in raster as well as vector database format. These spatial database represented in vector by three entity named
- point
- line
- and polygon
in GIS. So the feature on the earth surface (including man-made and natural) can be represented by these three entities. Such as if any location spatial data can be represented by point, whereas linear feature (road, river etc.) will be represented by line.
All the features in which area/region need to show then polygon entity will be used. Therefore in this article spatial databasecreation using QGIS will be discussed.
In this article, spatial database creation in the form of point entity using QGIS will be shared. QGIS is open source GIS software, which is freely available and capable to execute all process for spatial analysis.
QGIS can be used for all GIS based applications by using GIS functions and tools. Instead of creation of point, edit, style management and attribute creation will also be discussed in this article.
Feature creation in QGIS
Open QGIS by clicking on Start then go to All Programs and then click QGIS Desktop 3.8.3
Following window will open

Open the georeferenced toposheet via Layer then click Add Layer followed by Add Raster Layer

Following pop up window (Data source manager raster) will open. Browse and select the georeferenced toposheet for point features (Point features can be any location data like city, village, health centers, police station etc) creation via Raster dataset and Addbutton.
Georeferenced toposheet will open.

Now for Point layer creation, click on Layer then click Create layer followed by New Shapefile Layer

New Shapefile layer window will popup

Now In the above popup window define the File name.

Select Geometry type – ‘Point’ as here we want to create point layer.

Now specify Coordinate reference system (CRS) same as toposheet. For this click on Select CRS. A CRS selector popup will open, here define the co-ordinate system and Click on ‘OK’

Specify the attribute fields to the layer that we have created. If we want to create layer of villages then we will add ‘Name’of the Village as new field and population as other fields. For New field to be added, an appropriate Name, Type(like text, whole number, decimal number and date) and Length must be selected.


Click on ‘Add to Field List’ and the attribute will be added to the field list as shown below

Note: If you want to remove the added field from the list, select the field you want to remove and click on ‘Remove Field’ button.

The point layer created by you will be visible in Layer as shown below

Now you can start digitization, but before starting digitization you have to enable the editing mode of the corresponding layer. Right click on ‘JP_point.shp’ point layer and click on ‘Toggle Editing’ as shown below

Zoom into the toposheet where villages are present, Place the pointer at feature of interest and click. But before that select the symbol of village location and this could be selected from Style manager. For this click on Settings and then go to Style manager as shown below

Following window will popup. Here select the symbol of your choice and close this Style manager window.

Now click on Add point feature icon from digitizing toolbar.

Note: If Digitizing tool bar is not present in your QGIS window, then right click on main menu bar area and check the Digitizing toolbar as shown below

Now you can place the pointer at feature of interest and click. When you will click at the location, attributes window will open as shown below.

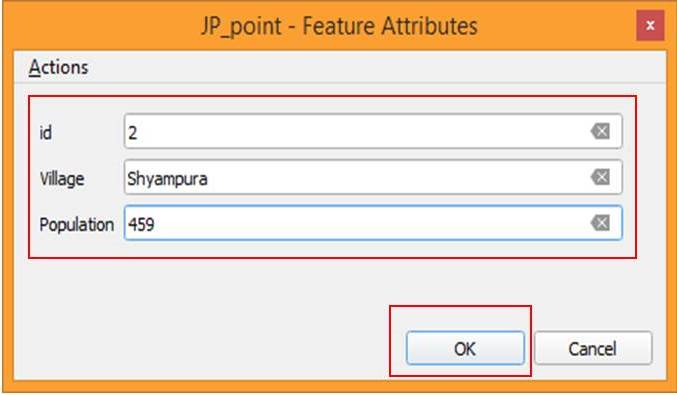
The point will be created at the specified location along with attributes. In the same way digitize other village locations in the toposheet.


If you want to edit any attribute information, then open the attribute table of ‘JP_point.shp’ by right clicking on this layer and select Open Attribute Table as shown below.

Select the attribute by double click and edit it. Now save the edits and after saving click once again on the toggle button to stop editing. Point layer creation and editing is over now.
By this process different spatial database such as location of basic amenities, ground water well location etc. can be created in the form of GIS layers.