Satellite Image Processing
Satellite image processing include various steps and processes to make image ready for interpretation and classification. These processes are important on each step of image processing such as geometric correction, radiometric correction, enhancement, classification etc.
These processing methods are also depend on number of bands present in image as well as on spatial and temporal properties of satellite image.
In this article some basic image processing tools are discussed using Erdas Imagine. As data downloaded/purchased than there may be some basic operations need to perform for digital image processing.
These tools may vary with data acquired, in general satellite data need to stack, subset, mosaic and re-projectbased on the project requirement and data availability.
Layer Stacking:
This process is primary process after acquiring satellite images as most of the satellite images are provided in different bands or layers, such as band-1 for blue wavelength, band-2 for green wavelength and so on.
If one need to make color composite than layer stacking tool is the process through which all the bands of that specific satellite image stacked in to a single file.
1. Select Interpreter from main tools window of Erdas imagine then go to Utilities and select Layer Stack.
The complete process is displayed in below figure.
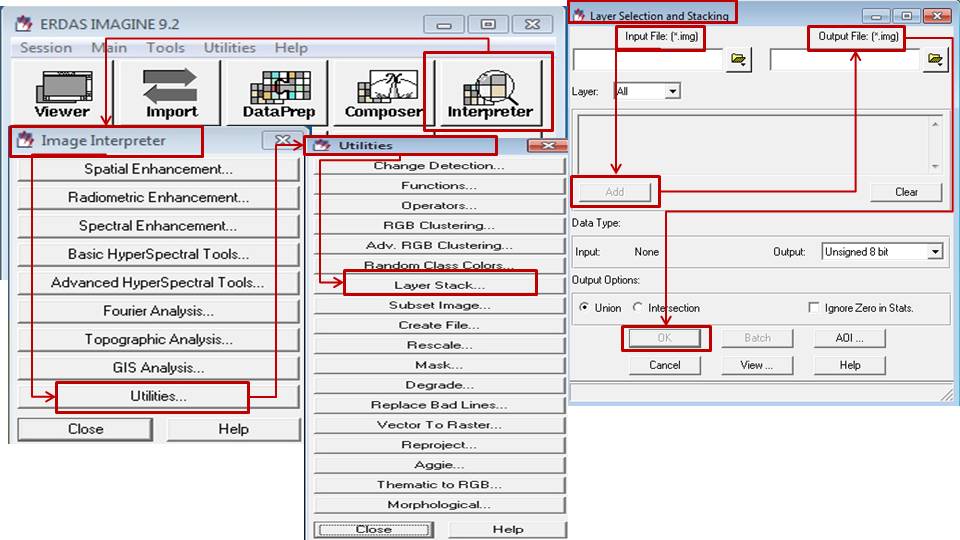
Figure: Layer Stacking process using Erdas Imagine software
2. In the Layer stack dialog, enter the name of the first file in the Input File. Be sure the “Files of Type” is set to the same input type as your data source. TIFF is normally used in Raster images.
The output image will contain the bands in the order that they have been input, so first add band 1, second will be band 2, etc.
3. Once a name is entered click Add. You will see the name of the file appear in the gray dialog list box. Continue entering and adding each layer/band files.
4. Define output file name, and select output file type. Generally it should be same as your input data types.
5. Click the Union output option, and choose to Ignore Zero in stats (this will produce brighter image). Click OK. The process will run. Your layers are now stacked in one image.
Subset:
This tool is used when study area is less than the acquired image size. Through this tool analyst can get only part of satellite image which covers study area.
For example satellite image acquired covers 180*180 sqkm area where as area of interest of end user is only 25*25 sqkm, in this case user can subset image for that part only for further digital image processing. Its mean, this process reduces time and efforts for digital image processing.
1. Select Interpreter from main tools window of Erdas imagine then go to Utilities and select Subset Image.
The complete process is displayed in below figure.
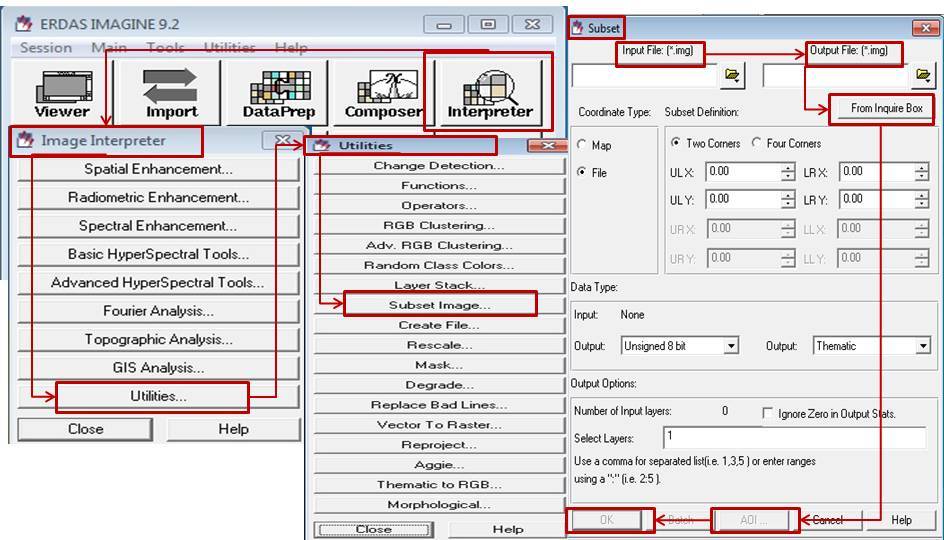
Figure: Subset process using Erdas Imagine software
2. In the subset dialog box, select the file, through which subset will be created in the Input File.
3. Define the output file in the specific folder from the output box, which will be created after the subset process.
4. Now the most important part of this process is to define the outbound of area of interest. For this there are two options provided in subset dialog box.
From inquire box–
in this inquire box can be defined in viewer, in which satellite image file is already displayed. Now just check the selection of inquire box and click OK in the subset dialogue box. Output image will be created in the defined folder.
From AOI – In this two method deploy to ,
i. first one to open or create area of interest in viewer over the satellite image then select the viewer option in AOI tool of subset dialogue box. With this sub set image will be received as outcome.
ii. Another process, when already existing AOI file used to create outcome- in this already existing file may be any boundary such as district, Tehsil and village. This file is directly used in AOI dialogue box of subset tool. Through this process image will be subset according to boundary file.
iii. Advantage of AOI process over the inquire box- in this AOI process more than one AOI can be used to subset the same image where as in inquire box only one inquire box can be create to subset image.
Through the above process image will be subset as per interest of end user and can be used for further digital image processing.
In the next article other two important basic processes will be discussed.
Good info!
Kindly share these raster process in latest software version as tools are placed now are in different way.
T&R, SM
Thank you for comment, i will share in my next article.